Thursday, July 31, 2014

Tracy Meisenbach: A Bit Over Rated


A Bit Over Rated

Bits are the most misunderstood and misused pieces of equipment within the horse industry. People are always looking for the “magic” bit that will make their horse behave, win, go slower, go faster, look happy etc. They ignore the fact that training has to take place before a bit can do any of these things, and the training needed is usually based on everything EXCEPT the bit.
I’ve studied bits all my life, from my first horse in the 1970s to the present it’s been a lifelong journey of horses and the bits that they use. At this stage I have a pretty consistent set of go to bits; a bosal, a full cheek or a loose ring smooth mouth snaffle, a sweetwater mouth medium shank curb, a mullen or low port Pelham, and a short S shanked hackamore. Any horse coming out of my barn can be ridden in these bits and do anything you want to do that involves a horse.
During my journey I have collected bits, some through outright purchase and others came with problem horses I was rehabbing. Most of these bits hang from my tackroom wall, covered in dust, a testament to what is useless, over rated or simply inhumane. A very few I might get out, dust off and use for one particular issue, and once the issue is solved the bit goes right back on the wall. I do have a show spade bit, and I can ride in one and pass a thread/horsehair test, but there really is no need to use it, it accomplishes nothing that I can’t do with another milder bit, and my horse certainly appreciates not having to carry the weight and metal in his mouth.
When people buy a bit for the purpose of CONTROLLING the horse, they are already set up to fail. A bit isn't about control, it’s about communication. Control should be established before you ever get on the horse. Whoa means WHOA. Stand means STAND. Every other cue should be in place before your butt hits the saddle. If you can’t walk, stop, trot, stop, canter, stop, back, reverse, sidepass, turn on the forehand, pivot your horse in hand from the ground, how on earth can you expect to do it from his back? If you let your horse drag you around by the halter, why are you surprised when he drags you around by the bridle? If your horse barges into you on the ground, why are you surprised when he barges over your cues from the saddle?  At the point where you CONTROL the horse in every aspect from the ground, then you are ready to COMMUNICATE from the saddle. Control does not translate as abuse; neither does communication, although both can be used during discipline or reward.
Are you a bit junky? If you've switched bits more than a few times and nothing is working then yes, you’re a junky, because you’re looking for a solution in hand that needs to begin on your feet. If you always go up in severity instead of down, then you’re not only a junky, you’re asking for bigger problems to come along. If you routinely scour the bit sales groups, ebay and craigslist for the magical bit that is going to solve your horse’s problems then you’re a junky and in sore need of some lessons to boot. A bit does NOT train the horse. The horse is trained by communication through the seat, legs, hands and finally the bit. You train the horse's mind, not his mouth. 
So how do we know which bit is the best to use? Simpler is almost always better. We all need to learn to examine a bit forensically and actually look at each component, because in the end each component will affect the overall performance. We ALL need to understand that mild, medium and severe are factors, regardless of how the bit is used. So I'll break down a basic forensic examination:


1) Thin closed twist, very sharp, can cut the tongue, lip and bars. Severe.

2) Open twist, square stock. Square stock is different from regular round twisted wire as it retains the edges of the square. These sharp edges can cut and dig into the tongue. See saw action can literally saw into the tissue. Severe.

3) Wide twist thin square stock. All those thin sharp edges move back and forth across the tongue and lips. Severe.

4) Open twist round wire, abrasive, grooves are wide enough to grab the pebbled surface of the tongue, also the edges of the lip. Any action on the tissue of the bars will be abrasive. Severe.

5) Wide twist thick square stock. This is a slow twist bit that people seem to think is kinder than a regular twisted wire. It's not. This big sharp edges create pressure points as they move across the tongue. Severe.
6) Waterford. Pretty much goes standing link, flat link, ball, flat link, standing link, ball, standing link, flat link, ball, flat link etc. Every one of those balls is a pressure point on the tongue. Yes the bit does form to the horse's mouth, yes the edges are rounded, however this mouth also creates pinch points between each standing and flat link. When it moves side to side it will grab the edges of the tongue and the lips. Severe.
7) Big link flat chain, Mikmar. This bit has GRAB. The flat joint in the middle allows the tongue to get caught and the wide spaces in the links also let in tongue tissue. The side joints at the lips are narrow and when the bit moves side to side they grab the lips and pull them out with the bit. Severe.

8) Thin bike chain. Forms to the mouth, rolls over the tongue like a series of thin edged tissue grabbers. Extremely rough on the edges of the lips and over any tissue that sits over bone. Severe.
9) Open work flat chain. Most flat chain bits are fairly mild, but when they are like this with open links that don't "stack" over the next link they are abrasive and particularly nasty at the edges of the lips and over the bars. Severe.
10) Standing link wide chain. Every other link is a hard pressure point into the tongue, pulling through the lips they create spread and then allow the lip to close over the next link, until pulled back through, catching the edges as the bit moves back and forth. Severe.

None of these mouthpieces is soft, none is appropriate for a green horse. The right set of hands for any of these don't exist. The purpose of these mouthpieces is to create pressure points to make the horse back off the bit an intimidate him into obeying. You aren't training, you are compelling through fear. These mouthpieces are capable of causing nerve damage to the tongue, bars and lips with very little pressure. On direct pull bits the see saw action will cause a lot of abrasion, with curb action you are going to get intense pressure points with the lips being stretched and lifted by the thinner edges, the tongue being pulled back and up. Think it through carefully before you use any of these mouthpieces, because sometimes the results are physically long lasting.

Snaffles
Upper Left: Ported Full Cheek snaffle with copper rollers and flat hinge

Middle Left: French Link Full Cheek snaffle

Lower Left: Half Moon Full Cheek

Upper Right: Ported Ringmaster Snaffle

Middle Right: Regular Dee Ring Snaffle
Lower right: Regular Full Cheek Snaffle
All the bits on the left are medium, the bits on the right are mild. The Ringmaster has a floating port and will adjust to fit a horse's mouth and surprisingly most horses I've used it one really like it.


Examining a direct pull bit:
Is the mouth piece smooth or rough ( rough means wrapped, twisted, slow twist, triangular, corkscrew, chain or basically ANYTHING but round or oval). If the answer is smooth then the mouth piece is probably not severe, if the answer is rough the mouth piece is medium or severe.

Is the mouthpiece jointed, straight or ported?
Straight and smooth means no tongue relief, so it can be harsh, it also means no flexing at the corners of the mouth. Instant grab. So medium.
Mullen means curved to fit the contours of the mouth and the cannons are usually oval not round, so mild.

Straight and rough means no tongue relief, plus abrasion, instant grab. Severe.

Single jointed and smooth means the tongue can be pinched and depending on the thickness of the cannons it can be mild or quite severe. Big fat snaffles are not always better as they encourage lugging and rooting.

Double jointed bits have less pinch, but also more abrasion when the rein drags the bit across the tongue. This see-saw action occurs in EVERY direct pull bit, even a full cheek, and the lips give to the pull and the cannons move from side to side. If the mouthpiece is rough this abrasive action is going to cause pain and head tossing or over flexing.

Chain mouthpieces should never be used with a direct pull bit. Most chain is welded and the knots at the weld point are like little pressure points on the tongue as the bit drags across the mouth.

Twisted wire, slow twist, bike chain, corkscrew are all severe mouthpieces, not matter the thickness. They are abrasive and with see saw action they grab the tongue, dig back into the surface and scrape across the sensitive papillae and shred or damage them. Rough mouthpieces also damage the bars and lips of the mouth. I have rehabbed so many cut tongue horses it is disgraceful, all trained by people that thought a twisted wire mouthpiece was okay. It isn’t, ever. What these mouthpieces indicate is a lack of skill and a lack of anatomical knowledge on the part of the trainer. If a single hair on your tongue would drive you mad imagine what a mouthful of metal does to a horse.


Curb bit with horsehair loops, pull too hard and they break. If you can't ride a curb like this then you don't need to be using shanked bits. (Pixie modeling, photo by Samantha Peterson)
Please don't share to Horse Debate Central, they are too stupid to understand. 

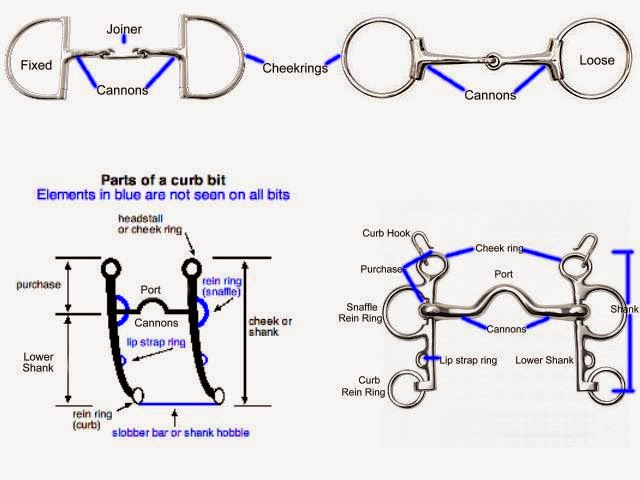
               Now on to shanked bits. Any of the above mouthpieces can be found on a shanked bit, which means that all can increase in severity rapidly. When choosing a bit for your horse understand that bits are levers. They work based on the pressure you supply creating a larger force to the bit. The curb bit consists of a mouthpiece, curb chain or strap, and a shank, with one ring on each purchase arm of the shank, and one ring on the bottom of the lever arm of the shank. Pelham bits add a ring for a snaffle rein, next to the mouthpiece. A curb bit works on several parts of a horse's head and mouth. The cannons acts on the bars, tongue and roof of the mouth. The shanks add leverage and place pressure on the poll via the crownpiece, and to the jaw via the curb chain or strap. A "loose jaw" shank, may act on the sides of the mouth and jaw. A curb bit is a leverage bit, meaning that it multiplies the pressure applied by the rider. Unlike a snaffle bit, which applies direct rein pressure from the rider's hand to the horse's mouth, the curb can amplify rein pressure several times over, depending on the length of the curb's shank. Shank sizes vary from two inches to more than 5 inches. The longer the bit shank, the more powerful its potential effect on the horse. For this reason, overall shank length, from the top of the cheek ring to the bottom of the rein ring, usually cannot exceed 8½ inches for most horse show disciplines.

                      The relation of the upper shank (purchase)—the shank length from the mouthpiece to the cheekpiece rings—and the lower shank or lever arm—the shank length from the mouthpiece to the lowest rein ring, is important in the severity of the bit. The standard curb bit has a 1½" cheek and a 4½" lower shank, thus producing a 1:3 ratio of cheek to lower shank, a 1:4 ratio of cheek to full shank, thus producing 3 lbs of pressure on the chin groove and 4 lbs of pressure on the horse's mouth for every 1 lb placed on the reins. Add in five pounds of rein pressure, the average pull needed to break a cotton thread or three strands of horsehair, and you’ve got 15 pounds on the chin and 20 pounds on the mouth BEFORE you look at mouthpiece severity or adding any training aids. Regardless of the ratio, the longer the shank, the less force is needed on the reins to provide a given amount of pressure on the mouth. So, if one were to apply 1 lb of pressure on the horse's mouth, a 2" shank would need more rein pressure than an 8" shank to provide the same effect.

            ALL bits are levers, even snaffles. There are several different kinds of levers, but all are based on the fact that at some point there is a fulcrum, and in the case of bits and bridles the mouthpiece is the fulcrum except in very special cases. In a class-1 lever, the force you apply is on the opposite side of the fulcrum to the force you produce. A curb bit is an example of a class-1 lever.
A class-2 lever is arranged a slightly different way, with the fulcrum at one end. You apply force at the other end and the force you produce is in the middle (up or out). Snaffles are an example of a class-2 lever. 


Bits can also be pulleys, even something as mild as an o-ring snaffle has a lifting effect at the corners of the mouth. If you have a gag snaffle you have a basic pulley in that pressure applied to the reins lifts the bit up the cheekpieces, applying pressure to the bit, the poll, the lips, tongue and bars. A gag action bit increases the force produced by half. So if you apply 5 pounds of rein pressure to a gag bit you get an extra 10 pounds of force in the horse's mouth added to the existent force/pressure ratio already created by the purchase/shank ratio. The more "pulleys" added to a set up means less pressure needed to produce more force. When you add in draw reins to a gag snaffle you reduce the amount of pressure needed by half, and increase the amount of force produced by another half. 5 pounds of rein pressure with draw reins/gag bit means 15 pounds of force at the fulcrum. 


Adding draw reins to a curb bit means that it requires a 1/4 of the pressure needed to achieve the same force as without the draw reins. So 5 pounds of pressure would translate to 20 pounds of force on the mouthpiece. I'm not a big fan of gimmick items, but I know that draw reins, martingales and tie downs can be used with good results IF used carefully and not as an end all solution. That being said I don't think draw reins or martingales should EVER be used with curb bits as they decrease the amount of pressure needed to provide a lot of force on the mouth. I have seen a lot of train wrecks from horses flipping over when they finally get tired of having their heads yanked in and their mouths abused. And I rarely see long term results. The moment the draw reins or martingales are taken off the horse reverts right back to getting out of frame, because the rider has not corrected the problem with their seat and legs, or the horse simply does not have the conformation to maintain the frame. 


Order of actions 1-2-3-4-5. On combo gags the noseband always engages last.

There is so much discussion about gags and combo bits, especially by the barrel racing crowd, I want to explain how they work here. People get defensive when told that the bit they are using can be harsh. All bits can be used harshly. Some bits are harsh the second they get in a horse's mouth. Regardless of the nature of the bit, each bit should have a mechanical purpose. And the fundamental of ALL horse training is that the horse moves away from pressure, not into it. So be prepared for a "scary" dissertation.

A snaffle is a direct pull bit that is supposed to draw the horse's head back, or to bend it during a turn. It supplies little to no poll pressure.

A curb bit provides leverage on the mouth, which draws the horse's chin in, and on the poll which drops the head down.

A bosal is a direct pull bit that draws the head back or into a turn, much like a snaffle, except the focus point is off the nose instead of the mouth.

A mechanical hackamore works off the nose and chin, again requiring the horse to tuck in, and some have a smidge of poll pressure, some don't.

So these bits DON'T give conflicting cues. The first action of the bit, a jiggle on the reins, is the same as the last action on the bit, a solid pull.

However, gag bits are ALWAYS about conflicting cues. 

          A snaffle gag pulls back and up, which causes poll pressure which requests the horse to lower his head. However his lips are being stretched up, so you're telling him to raise his head. Not only are you asking him to raise his head, but you're telling him that his nose going OUT is also a good idea, because HIS mechanics do not allow for his head to raise without his nose going out. During turns the bit climbs higher on the inside of the horse's face, which is a request to tilt the head OUT, while the poll pressure is requesting the head to tilt down and in.
             A gag curb is even more of a mechanical nightmare for a horse. The curb action WANTS to go in and back, but the gag action wants to go UP first, then in, then back. But the curb chain and poll pressure are telling the horse go IN and DOWN. Being told head UP and head DOWN in the same cue cycle is horrible. Gag curbs also go IN and UP with pressure on the tongue, so the tongue gets wadded up behind the cannons of the bit as the bit climbs. It is unavoidable. The cannons are dug into the tongue and the leverage is pulling the cannons UP so the tongue goes with it. There is a brilliant x-ray of a horse with a curb gag and the tongue is clearly lumped behind it.

           Now throw in a noseband. We're back to the noseband, curbstrap and poll saying DOWN and IN and the gag saying UP and OUT. What we KNOW is that the MOUTHPIECE is ALWAYS going to have the most clout with the horse. So if the gag action says UP and OUT, that's going to be his first reaction. Then the other things same no no, go down and in and now you've got a horse caught in a bear trap with no relief in sight. In most cases he fights his head, raises his neck convexly, hollows his back and does the horrible lofting with his front legs around turns and during stops. This is why most speed event horses are just bat shit crazy in the arena. It's got NOTHING to do with high spirits and everything to do with being told conflicting cues on their head.

            So bit junkies, throw away the crap, gadgets, gizmos and searches for a magical cure all bit. Train your horse from the ground to respect your cues every time and then your efforts in the saddle will be less stressful and more communicative. A bit is not going to solve your long term problems, only clear communication can do that. And cleanse your vocabulary of the phrase “It isn’t the bit, it’s the rider”. No really, sometimes it’s the bit, and most of the time the “magic” bits belong in the trash. 

Copyright July 2014
Tracy Meisenbach
Article and photos/chart cannot be used, shared or published in any form, printed or electronic without author's written permission.


Tuesday, June 10, 2014

Tracy Meisenbach: Proper leg wrapping. Why is something so easy, so hard?

Leg wrapping is one of the most common forms of leg protection and one of the most misunderstood. The leg from the knee down has no fat, no heavy muscle layer and no articulated bone structure. It moves front to back and cannot safely extend forward unless the elbow and humerus are completely engaged.

The front legs are prone to damage from the rear legs and hoofs. A hard hit by a rear hoof to the pastern, cannon or quarters can permanently injure a horse and remove him from competition. Wraps and boots can help protect from the strikes and also help your horse not hyperextend his tendons past their limit.

A standard leg wrap is made of felted fleece, 4.5 inches wide and 9 feet long. In the old days they had thin ties to keep them on, now they have wide Velcro straps, a vast improvement. To  understand how wrapping affects the leg you first have to look at the anatomy of the leg.


 The deep flexor tendon (red) and the superficial flexor tendon (blue) as well as the sesamoid bone are what the wrap protects. As you can see the deep flexor tendon goes down into the hoof. Injury to this important tendon can completely remove your horse from competition.

The tendons need to be able to move up and down smoothly within the tendon sheaths and to not encounter anything that hinders this smooth movement. If the wrap has one layer tighter than another it can cause the tendon to “hitch” on the edge of the tighter layer and create a bow. This can easily be avoided by making sure the first layer of the wrap against the horse’s skin is one solid smooth piece.


How to create a smooth inner surface? Turn the wrap so the inside of the wrap is facing the leg. The roll should be under the tail. Place the top of the tail against the mid point of the knee and unroll down. It does take some practice to be able to do this smoothly and easily, and a fidgety horse can make it a chore. However, once you are used to it you can do it as fast, or faster, than the old fashioned style. I used to wrap 8 polo ponies all the way around in about 35 minutes.
 Once the tail length is set move your hand down the wrap, keeping it smooth. Bring the roll to just under the curve of the pastern. This smooth layer of wrap will mean that there is no uneven tension down the back of the leg and no ridges that the tendons can hang on. It is imperative to allow free and fluid movement of the leg. So why not do this in the opposite direction, go from the bottom to the top and wrap down? Because the tendon is already stretched just by the leg being straight, like a big rubber band.  When a horse is just standing around his leg is at the mid point of its flexion. When he lifts the leg in it retracts the tendons to their shortest length and when he extends out in full stride the tendons are at their longest length. So you don’t want to push DOWN on an already stretched tendon. This is why wrapping from the top down is such a bad idea, because you are pushing down on a tendon that is already stretched. You want to support the tendon, so the first layer is smooth, then wrap UP, so the tendon is NOT hyperextended before the horse even starts running.


Now flip the wrap over so it’s going to unroll the correct way and unroll toward the front of the leg. Always wrap counter clockwise on the left legs and clockwise on the right. This keeps the tendons toward the inside of the leg and aligned within the sheath. Flipping the wrap also creates a triangle of extra padding right at the inside pastern, which is where most of the hard strikes occur


 Wrap around the front and then to the back, putting tension on the wrap as you encircle the leg. Wrap UP, making sure the inner layer stays smooth all the way up the leg.


 Raise the wrap level each time you circle the leg and keep the tension even and smooth.


Your last wrap up the leg should be right under the knee capsule, with about two inches of tail sticking up.


Fold the tail over and continue wrapping around the leg. This will be where you start to wrap downward


 Wrap over the tail. This keeps the wrap from sliding and provides another layer of protection at the top of the tendons, which is also a common strike zone. Be sure you are pulling the wrap consistently tight, loose wraps can cause more problems than tight wraps as they can slide and wad up at the top of the pastern, or come loose and cause a horse to trip over them


Wrap down, evenly spaced layers.


Go under the pastern and then back up. This creates a nice support layer and prevents a hard grab on the pastern.


Wrap back up the leg. So now we have a smooth layer down the back, a wrapped layer up, a wrapped layer down and now for our last wrapped layer back up.


A good, smooth, evenly spaced wrap job, tail tucked in securely, all the hard hit areas with an extra layer, nothing preventing the tendons from moving freely up and down.


When you end up here you've done the job correctly. The tapes should be flat along the side of the leg, not across the back. The front triangle is in place right under the knee. It takes a lot of practice, but it keeps your horse safe and can prevent a hard hit from damaging your horse’s legs. Practice makes perfect, so practice, practice, practice!


Copyright June 2014
Tracy Meisenbach
Article and photos cannot be used, shared or published in any form, printed or electronic without author's written permission.

Sunday, March 30, 2014

Tracy Meisenbach: Buying a dream horse? Or getting taken for a ride?


             You’ve finally decided to buy a horse.  You might be a kid who is horse crazy and finally talked your parents into taking the plunge or you might be an adult who has always dreamed of owning a horse and now you have the time and money to make your dream come true!  In either case there are some guidelines that you need to follow to be sure you get the best possible horse for your riding enjoyment.
The first thing you need to do is assess your needs.  Are you planning on being a pleasure rider or a competitor?  Do you want to ride English, Western or both?  Will you work with a trainer or on your own?  The best advice for a beginner is to start simple and work your way up.
If you plan on pleasure riding, and this is where all riding should start, then a well-trained gelding or mare is your best bet.  Buy a horse with a several years of training on it.  A quiet horse with seasoning is going to get you on the trail sooner and safer than a green horse.  Regardless of whether you ride English or Western a calm horse is going to make the difference between a spook and run or a look and learn.  There is no substitute for actual time under saddle and a green horse simply won’t have the conditioning to deal with a new experiences and an inexperienced rider at the same time.
           If you are an inexperienced rider take some lessons.  Think you can’t afford it?  Well, can you afford the hospital or vet bills and time off from work because of an accident that could have been avoided if you’d had some instruction?  In all likelihood taking lessons will cost less and provide more than a trip to the emergency room.
Now you’re looking for the horse.  Are dreams of a fiery black stallion going through your head as you peruse the ads? Probably. Drop them and face reality. Stallions are not for beginners.  Most boarding stables won’t even allow them.  Their handling issues and stabling requirements are double an average gelding’s.  This is not to say that stallions are vicious troublemakers. Good ones aren’t; I’m rather fond of the three I have.  But a good stallion can become a bad stallion with very little mishandling. Don’t risk it and leave the stallions to the people who have breeding farms and the facilities to keep them.  A nice mare or gelding will be the best riding horse for a beginning rider.
Thinking of buying a cute fuzzy colt and growing up together?  This is another bad idea that can have catastrophic results. The money you spend, raising a colt you can’t ride for several years, is double what you will pay for the average sound trained horse. You’ll spend that amount of money before you even start to train the colt.  Baby horses are not like puppies.  A baby horse will one day be about 1000 pounds and have the ability to kill you with one kick.  Learning as you go with horses is a recipe for disaster. And if you mishandle a horse you can’t just stake him out in the back yard and ignore him, you’ve got to sell him or dispose of him, generally at a substantial financial loss.
What is your purchase plan: Private seller or auction? If you are inexperienced with horses I would avoid auctions. There are too many things that can be wrong with a horse that a beginner is not going to look for.  Some traders are unscrupulous and will sell drugged horses or horses that have a disability masked by drugs or shoeing.  At an auction there is usually no time to get a vet check in and because of the transient nature of auctions it’s hard to trace a horse that is sold as un-registered.  For your first horse it is better to buy an animal you can get a history on, or your enjoyment in your horse can be going, going, gone.
After checking internet ads and newspapers you finally find the ad that interests you, you’ve made a decision and you’re going to see the horse.  Call the owner and get the important details.  Always have a notebook and make some notes on each horse you call about.  If the horse sounds suitable make an appointment and stick to it; the owner has a life outside of selling his horse and he deserves courtesy from you. Do not waste the owner’s time by not showing up or not calling. They are putting things aside to deal with you, be courteous. And don’t be a tire kicker. It is beyond rude. If you can’t afford the horse don’t waste the seller’s time. If you’re “just looking” let them know. Horse farms are busy places and require a lot of effort, taking time out to deal with a potential buyer means other chores get put aside and have to be caught up on later.
The first impression is the strongest and most people fall in love with just one look.  Try not to.  Animals have a way of winning our hearts and big soft-eyed silky-coated geldings really have a lock on it.  When you arrive take note of the surroundings the horse is kept in.  Is it clean and safe? Are there other horses?  Are they well cared for?  Observe the horse.  Is he quiet?  Does he allow his head and feet to be handled?  Is he easy to saddle and bridle?  A major concern for me is to arrive at the seller’s and find the horse already saddled and warmed up.  Sorry, but I’ll come back and look another time or strike it off my list.  I want to see the horse’s manners when he’s fresh and un-worked.  This is how I will be dealing with him at some point every day and I want to know he’s not bad mannered or dead lame without a warm-up.
Now carefully check over the tack.  If the horse is being ridden in a hack-a-gag with a tie-down he’s probably too hot for a trail horse and not quiet enough for pleasure, he will also have major retraining issues.  If he’s in a snaffle or plain curb then it’s a good bet he’s a quiet horse.  Make sure the equipment is safe for use, I’ve seen some bridles that were held together with string and a promise, if it looks like it might break don't get on or request they supply something safer.
Ask the owner to ride the horse first.  Why?  Because you want to observe the horse in his most comfortable situation.  If he’s tossing his head and fidgeting while the owner mounts then you’ve got re-training ahead.  Is the horse quiet when mounted? Does he move off freely with no fuss and is he responsive to cues?  Are his gaits even?  Observe the horse moving at all three gaits in each direction.  Make note of anything that doesn’t look right or you feel should be addressed.  If the owner doesn’t have a suitable answer then you need to make note of that too.
Ride the horse yourself (Provided he didn’t buck the owner off).  Does he respond to leg and rein cues?  The owner may tell you the horse uses different cues from what you’ve been taught, and this is ok as long as the horse listens to your efforts to interpret his normal cues. (Some trainers use their own cue system, if the horse is a candidate for purchase ask them to elaborate on it)  Does the horse feel smooth with no bobbing or hesitation?  Turn a few tight circles in each direction.  Are there any hitches in his gait?  Does he move out confidently with no lugging on the reins or head tossing?  If the horse is trained for a specific discipline put him through his paces.  Run a barrel pattern or take a few jumps.  Is he riled up afterwards and hard to control?  Or does he calm down as soon as the exercise is over and remain attentive?
After you ride then offer to unsaddle the horse and put him away.  Does he stand quietly while being un-tacked?  Is he cinchy or does he display aggressive behavior such as ear pinning or lip curling?  At this point I usually ask to see the horse load if the owner has a trailer handy.  While a bad loader can be corrected I want to know it beforehand.  Observe the horse and owner carefully and record your observations.  Watch the horse as he is returned to his stable or pasture.  Can you lead him to his pen on loose lead or does he try to drag you back to the barn?  How does he react when first turned loose?
Make notes on all you have observed and if you feel the horse is a good prospect make a second appointment to see him, this time with your trainer or another trusted horse expert.  There is a reason to take the expert only once. You need to know how you feel about the horse.  It’s your money paying for him. I’ve seen too many people that get talked into too much horse by an enthusiastic trainer.  You don’t need a horse that is going to require a lot of refitting before you can even ride it.  If it’s too much horse for you admit it and move on.  Taking the expert the second time lets you get a good outsider opinion and also lets you watch a qualified person you know handle the horse.  Observe the horse carefully again. Does he behave the same as he did the first time?  Consistency is a big factor in enjoying your horse and if the horse seems to change from day to day you’re not going to enjoy him nearly as much.
If the horse is supposed to be registered ask to see the breed association’s papers.  Vague promises about having to dig them up won’t do, make it plain that papers must be produced before money changes hands.  Once you see the papers check the description of the horse against the actual horse, hopefully it will match.  Also check to see that the listed owner is the person you are buying the horse from.  If not make sure there is a transfer giving ownership to that person and a blank transfer to sell it to you.  Trying to sort out a paper trail on a horse is a frustrating and time-consuming task.  Avoid it if possible.
            Now is the time to decide whether you want the horse or not.  Two visits may not seem like enough, but face reality and understand that others are probably looking at the horse too. After three visits most sellers are going to get pretty fed up if you don’t make a commitment.  Prior to the vet check most sellers require a deposit.  Depending on the price a few hundred dollars usually works.  Pay by check and write on it that acceptance of payment guarantees an established deposit for {description of horse}.  If cash is required get a signed receipt that also includes the description of the horse and the notation that the deposit is pending a sound vet check.
If, after all the riding and trials are through, you think the horse will suit you then set up a vet check.  Be sure the vet is not the same one the owner uses and that it is a vet you trust.  If the owner refuses to allow a vet check walk away and never look back.  However, this is unlikely, since the owner should want to know if anything is wrong with the horse and it’s your money paying for the vet check.  Most vets will give you a thorough rundown of the horse’s pluses and minuses.  Watch how the horse reacts to the vet and again look for consistency in his behavior. Request shot records and proof of a negative Coggins test. Some states now require a Coggins test every time the horse changes ownership so know your state laws regarding Equine Infectious Anemia.  If the current Coggins is over 6 months old request a new one.  While a year is standard for most states, a year is also a long time and the horse may have been in contact with a carrier in that time.  Play it safe and get a new Coggins.  Also ask about the horse’s de-worming program and any other medical care he has had.  Getting it all out in the open now can save you a great deal of heartache later.
In this day and age it is imperative you ask about genetic testing for any horse you look to purchase. The stock horse breeds carry HYPP ( from the Impressive lines) PSSM 1, HERDA, GBED and MH. Ask if the horse is tested or comes from tested parents. A reputable breeder will test and tell you the results. If the horse is positive walk away. Do not buy a positive horse. The care and upkeep they require can mount to thousands of dollars a year if they are symptomatic. Don’t let someone tell you they can be easily managed, that is only in the mildest cases, and a horse can go from asymptomatic to chronically affected overnight. Don’t think it doesn’t matter if you are buying a gelding, they can have symptoms just as bad as breeding stock. Ask to see the actual lab copies of the tests. And make those results a part of the bill of sale, so later on if the horse does have issues and you retest and find he has the defect you have grounds for fraud.
Now the horse has passed the handling, riding and vet check.  His papers are in order and his health is fine.  What next?  You need a place to keep him.  Hopefully you have a place picked out to board him or a pasture to keep him in at your place.  He needs a halter and lead, bridle and saddle, a good pad and various grooming tools.  Line up a vet and a farrier and make contact with your local feed store.  Then it’s read and listen to every tidbit you can.  Save the good and discard the bad.  Once you get the horse home acclimate him for several days before going on any long distant rides and then get him into a routine.  That’s when the fun starts.

(Note: While helmet laws are not in effect in all states and liability issues differ from state to state, I recommend wearing a helmet whenever trying out a new horse.  Riding an unknown horse, whatever your skill level, is a dangerous undertaking, so use caution.)

Tracy Meisenbach
Copyright 1997
All rights reserved foreign and domestic
Do not share, republish or post with written permission


Sunday, March 23, 2014

Tracy Meisenbach: Smooth Selling or Making Waves?


The time has come to sell your horse.  It might be a backyard pleasure horse or it might be a World Champion.  Either of these horses needs the same basic marketing to get the best possible home and price.  There are several steps to making a smooth sale. Following them can mean the difference between an easy transaction and a big nightmare.

Evaluate your horse honestly.  What are his strong points and weak points?  Is he registered or grade?  Has he been genetically tested for defects that could affect his life or  performance? Does he have a discipline he excels at or is he just a pleasure horse? Does he have any bad stable manners or ring habits?

Anything you find wrong with him as an owner, a buyer will find twice as bad. Don’t advertise a horse has having "halter" potential unless he really does.  A halter professional will shoot him down in a second and your credibility will take a severe hit. Please don't use the word RARE in your ad. There is very little that is truly rare in the horse world and using that term immediately sends up red flags. If your horse is truly rare, why is he not being marketed at a higher level than craigslist and facebook? Black, cremello, blue eyes, Friesian, Gypsy Vanners, NONE of these are rare. In fact the market is flooded with some very poor specimens right now. Using the word FOUNDATION in your ad, to provide merit, without a show record is also a red flag. Pedigree is a good selling point, as long as conformation and ability go with it. No horse is worth $10,000  based on pedigree or color. Be honest and objective and price
your horse accordingly.

If the horse will be too spirited for a beginner rider, say so up front and don’t let a novice talk you into letting them try the horse.  They could be injured on your property and you can be found liable.  Remember it’s easier to sell your horse on what he is then on what he might be. Set ground rules for a visit. No open toed shoes, loose dogs or loose children. Have your state’s limited liability signs posted at the gates to the barn and pasture. Do everything you can to protect yourself, before you get sued.

Prepare your horse for sale.  This doesn’t mean spraying Thunder down and putting an ad in the local paper.  If you take short cuts you’re going to get a lot of time-wasting lookers who will never see past the dirt and shaggy mane.  Make an effort to actually sell your horse.  You wouldn’t show up at an important job interview in a T-shirt and Bermuda shorts would you?  Every person who looks at your horse is interviewing it as a potential investment.  This means you need to make your horse appear at his best.  Clip him enough to be tidy, wash him if he’s dirty. Feed him up or slim him down as he needs it.  He needs to look well cared for and loved.  Work on his ground manners and barn manners.  Get him to the best he can be and a buyer will notice.

Advertising is a key point.  If you are going to do photo advertising then take good shots.  Don’t stand your horse in a hole or take a cute picture of him rolling.  This makes your horse look unbalanced and makes you look unprofessional.  Stand him on level ground and point your camera right at the midpoint of his barrel while you are in a crouch position.  This prevents his head from looking huge or his hips and withers from looking uneven.  Don’t take pictures with a fence as a background. This "cuts" your horse in half and can make him look uneven against the straight edge of the fence. If you are going to shoot a video than take one of the horse un-tacked first and then being saddled and ridden.  Again go for level ground and bland backgrounds.  You want the horse to stand out, not the fact you have a nice board fence. Do NOT use
photos of you standing in the saddle to market your horse. You look like an idiot
and completely unprofessional. It’s a redneck trick and just points out the level of seller you are.


Setting up your ad can require a lot more thought than you might have considered. If your horse is a young stallion and you advertise him as a stallion prospect, you are in essence saying he will have all the necessary equipment to reproduce another horse when bred to a mare. This includes a working penis, two testicles and a sperm count in the upper digits. What? Two testicles? But your horse is only six months old, how the heck can you assure that?  The answer is; you can’t! Advertising a yearling or weanling as a future breeding prospect is foolish and leaves you open for a lawsuit.  You have no idea what the colt is going to look like as an adult.  If you stipulate in print that your horse is a breeding prospect then you are giving the buyer reasonable expectation that the colt will meet breed and show ring requirements.  Should the colt fail to reach these standards you might find yourself sued for misrepresenting your horse.  The same goes for selling a filly.  You had better have some concrete proof she can reproduce or her broodmare potential is in question.  The best bet is to sell a foal based on their bloodlines, conformation and disposition.  Give the buyer something they can see and touch and don’t speculate on the future.

Once the horse is ready and your ad outlined, then place it where you’ll get the most exposure.  Put it in the local paper, horse trader magazines, and national breed magazines or on the Internet at one of the popular horse sites.  If you have a certain time of day it is easier to reach you then list that in your ad.

Examine the prices of comparable horses and stay in that range.  Also know the area you’re in and understand its market base.  A $1000.00 horse in Montana might bring $4000.00 in Los Angeles, but unless you want to haul your horse to California to sell it then plan on getting a $1000.00 if you advertise locally.  If you advertise on the Internet be prepared for sending videos and photos.  I typically charge a ten-dollar deposit on videos, that way I know the person is interested and that I’m going to get the video back if they aren’t.  For photos there is no charge, but I do ask that they be returned if the person doesn’t like the horse.

Keep notes on all calls.  This is important because it tells you who is looking and why.  It also gives you a list of people who have horse interests in your area.  If you set up an appointment always get a return phone number.  That way you can call them if they are late or a no-show and find out what happened.  Sometimes you want to reschedule and sometimes it’s better to simply tell them not to come.  If your horse is registered it’s a good idea to have a copy of your horse’s papers and his vet records by the phone so you can answer questions about his health and background.  If you’re selling a mare or stallion have their produce record or show records.

Showing the horse.  A buyer finally arrives to look at the horse.  What are the best ways to show him off? First don’t saddle and warm up the horse prior to someone getting there.  It looks fishy and makes them think you’re hiding something. (If you are hiding something then you need to stop and be up front about it; because with the laws now protecting a consumer you could be sued for fraud or misrepresentation) When the person arrives introduce them to the horse and let them watch you groom and tack it up. Make sure your equipment fits and is in good safe condition.  Take the horse to an enclosed area and warm it up.  Show the horse at all of its gaits going both directions. If the horse is being sold as a specific discipline horse then work it with that in mind.

Next allow the buyer to try out the horse. (I recommend requiring them to wear a helmet. I keep an old one on hand just for this purpose.) Observe how they are with the horse.  Are they nervous or jerky?  Does the horse seem uncomfortable?  Are they confident and caring? Does the horse respond smoothly?  After the ride un-tack the horse and demonstrate any other training you feel would show the horse off.  I like to load and unload the horse from a trailer and then hose him off to show docility.  Too many people have bought the "perfect" riding horse only to find out it’s a battle to get it in the trailer or give it a bath.

If the buyer is interested in your horse now is a good time to go over the horse’s paperwork.  Make sure the Coggins, ownership transfers and health records are all in order and easy to read. Having current photos of foals produced is a good selling point for a mare or stallion.  Allow the buyer time to think about their purchase.  I've heard the “ Someone is coming back at 5:00 with a check” line so many times I usually just walk away and go look at another horse.  If someone really is coming back at 5:00 make it plain, but don’t try to force a decision.  Allow the buyer to make another appointment that fits into your schedule.  Often they want to bring a trainer or friend to see the horse.
This isn’t unusual and is no reflection on their trusting the seller.  They simply want verification of their opinion of the horse.

Two visits, possibly three, are the limit I set.  The week-long try outs while bringing every member of the family out to see it tells me the person isn't committed to buying a horse and he needs some other horse besides mine to be the guinea pig. While the objective of selling the horse seems to be to get the money in your hand that’s not really the case.  By offering this animal for sale you are advertising your business, integrity and professional ethics to the world.  One bad sale put out by word of mouth can ruin a horseman.

If the buyer has determined they want the horse then let them set up a vet check. The buyer should also make a deposit on the horse.  State laws concerning deposits vary, but the general rule is that if the vet turns up something wrong with the horse you refund the deposit. If you already know something is wrong with the horse, such as cribbing and tell the buyer the horse has this problem and the buyer still pays a deposit then the vet determining cribbing as a flaw is not grounds for return of the deposit.  But as I said, check your state laws and also have a bill of sale handy for just this purpose.  If the horse passes the vet check then make payment and transportation arrangements.  Typically if the horse is within 25 miles I’ll deliver it free, anything over that and I charge by the mile. If they are picking the horse up then be sure you have a set time to meet them and call that morning and confirm it’s still on.  Last minute details can add up and make for a long wait.

Selling a horse is often a heart wrenching experience, so make sure you have the best possible home for your horse and get the best possible price.  Look at all the necessary components of making a good sale and then try to stick to them.  This will make your sale go as smoothly as possible and provide a safe secure home for your horse.

Notes:
I've been asked several times to allow a horse to go on try out.  I don’t
recommend it for a few reasons.  The horse can be injured while at a new place and can come in contact with communicable diseases, which will end up back at your barn if the horse returns.  If you do allow a try out then have a contract drawn up stipulating all requirements and have the full purchase price of the horse held by an escrow company. If the horse is injured, he’s considered sold and the escrow company will release the money to you, whereas a disgruntled buyer can stop payment on a check or return the horse. It is also a good idea to require insurance be carried on the horse while he is on try-out. Make sure you are the beneficiary since you will be sustaining the loss if the horse has to be put down.
Craigslist has spawned a level of scammers that didn't exist when I started in this business. Don't EVER accept a cashier's check or money order for your horse. They are too easy to forge. No one is going to pay top price, add a little extra and buy your horse sight unseen, while having a friend pick it up. It just doesn’t happen, so do not buy into that line of scamming. If someone wants to pay with anything other than cash, require a personal check and make a copy
of their photo ID. That way you can take them to court for theft by check. Paypal is really not safe because the person can dispute the sale after they take your animal and sometimes get a refund. Do NOT let your horse leave the property until payment is secured and verified. If you do then don't be surprised if you get scammed.


Good luck and smooth selling

Tracy Meisenbach
Copyright 1997

All rights reserved foreign and domestic
Do not share, republish or post with written permission

Monday, February 24, 2014

Tracy Meisenbach: Riding to Compete or Competing to Ride


            Riding is a lot of fun. It’s a physically active sport and also requires a lot of mental engagement. When coupled with the fact that it brings us closer to those great hairy beasts we are obsessed with, it’s often the best form of therapy against the stresses of daily life. As more and more people discover the joys of riding and horse ownership I see a definite reduction in the quality of riding and training, vs the quantity of riders and horses. It’s not a good trend.
            When I started out in horses good equitation was drilled into us from the moment we got on a horse. Classes like western pleasure and hunter under saddle REQUIRED a good, well presented rider. It wasn't about the bling, it was about your seat and hands. Now judges don’t even look at equitation in these classes, as is evident by the leaning back and pumping heels you see at World and National shows.
            Back in the day you learned to ride and then when you finally got good enough to be in tune with your horse you started competing, first at a local level, then regionally and finally, if you were good enough, nationally. It was a big deal. A National championship meant a lot because it was the result of years of work and dedication. Horses that showed in halter also showed under saddle, proving that their conformation was truly form to function. Now, except in very rare cases, those days are gone. Poor riding has become the norm and it’s a disgraceful trend. I see top level trainers that have less riding ability and ring etiquette than local 4 H riders. I see leaning back, horrible bouncing, legs pumping with every post, constant hand movement, and constant spurring. It’s almost like the show ring has become a puppet show full of poorly guided marionettes.
            In the speed events it’s become even worse. The riding I see at rodeos and jumping competitions is downright scary and embarrassing. Whoever invented the super extended, kicking every stride, barrel racing method was an idiot. It looks bad, actually slows down the horse as he braces for each kick, and creates a non-existent seat as your butt flies up a foot out of the saddle before slamming down onto the horse’s back. And the jumping with the exaggerated two point, super short stirrups, death grips on the reins and constant see sawing around the ends is just deplorable. WHERE HAVE ALL THE RIDERS GONE?
            In the here and now a trainer can win big money and still ride really bad.  Why? Because most of the trainers are being judged by people, who are also trainers, and they ride bad too. When you look at the stock horse industry the hunter section has become a travesty. There are judges hired to assess English classes that have NEVER ridden in that event. They've never been to USEF shows. Their exposure to English classes has been watching the other stock horse boys ride. Well that’s like learning to be a mechanic from someone that has no idea how to work on a car. Their ignorance is reflected in the horrible trending down of equitation. Let’s face it, proper form while riding is a thing of the past. Even in the Olympics someone that leans back and has a leg that swings like a pendulum can get a gold medal, the Beijing games were proof of that.
            So let’s step back a moment and look at why proper riding has gone away. Riding is a discipline, like ballet or gymnastics, which requires “form” in order to create the correct “function”. Of course you can muddle through, but in doing so you risk injury to yourself and your horse. And you waste a lot of time and money before you get good results. We need to remember the horse should NOT be used as a guinea pig while we try not to kill ourselves while learning to ride. Think about it, you’d never go hop in an airplane and just fly off into the blue. You’d never reach the end of the runway before killing yourself. A horse needs the same mindset. He’s a set of earthbound wings and to guide him safely and to take advantage of his power and flight you NEED to know how to handle him correctly. Here’s a list of things you should know before you EVER ride into the competition arena (barring leadline class!)

1)      Proper equitation. This means the automatic alignment of ear, shoulder, hip and heel. Your back should be straight, no duck butt or leaning over the cantle. Your shoulders soft but square, knees slightly bent, just barely able to see your boot toe if you look down. Your upper arm should be in line with your body NOT extended out with your hands wide open like the western pleasure riders do today. Arm down, hand closed, wrists flexible. Heels should be DOWN. Mot level, not pumping with every stride, DOWN. You should be able to snap back to good position within seconds and YES you maintain it through speed events, over fences and doing any patterns. If you CAN’T then don’t punish your horse with competitions until you can. It’s not your horse the judge doesn't like, it’s your riding.
2)      Know all the gaits, while maintaining proper equitation. This means that at a walk, jog, lope or walk, trot, canter your butt is in the saddle, it doesn't bounce. You don’t sway like a drunken camel rider, you don’t crouch like a monkey on a stick. You RIDE the horse at all times.
3)      You can stop the horse without raising your hand to your chin, jerking on the reins, throwing yourself backwards, leaning back over the cantle or sticking a spur in your horse’s side. A stop is subtle, it is graceful and it is gentle. You want to know why horses dread stopping? Because poor riders have made it a sequence of torture that starts with jerking the reins and ends with back pain that even the average chiropractor can’t fix. Learn to stop and don’t move on until you do.
4)      Know how to move both ends of your horse and the middle. If you can’t do a slow turn on the haunches, forehand or basic sidepass, and correct flying lead changes you have no business running barrels, jumping or even going down the trail. Your horse has a keyboard down his side and each button tells him what you want to do. If you randomly whop the buttons like a cat walking across a laptop you create confusion and resentment. Learn the cues before trying to learn the event. And if your horse hasn't mastered these skills he has no business being worked on a pattern or over a jump course. Don't create problems because you are in a hurry to get in the show ring.
5)      It is ONLY after you master the above 4 that you can even consider moving on to pattern work and speed events. Do NOT try to learn patterns and speed while learning equitation. You will create more bad habits in yourself and frustration with your horse than you can ever undo. Learn to ride FIRST. Don’t play tough, don’t “cowgirl up”, don’t go all “redneck fever”. LEARN TO RIDE.
6)      Once you know how to ride, and are working in unity with your horse, then you can add speed, turns, harder stops and obstacles. And after you add these things your equitation is STILL important. It’s important for your safety and for your horse’s physical health. I see comments all the time about lameness, sore backs ( both people and horses) being ring sour, dangerous behavior and once I investigate the common denominator is usually the rider. The rider bounces, jerks, flops, doesn't balance or take into consideration the physical structure of their horse. So LEARN to ride. Take lessons from someone that KNOWS how to ride and that does not mean the local Natural Horsemanship trainer that thinks standing on the horse’s back or laying it down is a demonstration of ability. You want to know what it means to ride with your butt in the saddle and your horse upright.

New Rider Common mistakes        

1)      Thinking a new bit will fix YOUR problem. If your riding is causing your horse pain or confusion a newer harsher bit is NOT going to fix anything, it’s going to make it worse. More pain added to more frustration usually means a showdown at some point and people always lose.
2)      Make sure your tack and clothing fit the job. Don’t ride in tight boots, slippery pants, really baggy clothing. The barn is a place to work, not show off the latest fashion trends. Make sure your horse’s equipment fits him too. I realize the big belt bridles and bling buckles are all the rage, but they fit poorly and rub and annoy the horse. Use common sense. When you “bling” out and then fail to turn in a good ride you look ridiculous.
3)      Learn correct terminology. LISTEN to other horsemen at competitions. Look at what they use and KNOW the difference between good training and flashy training. Don’t mimic the jerk and spur crowd.
4)      When you have a problem with your horse the first thing to assess is YOU. Once you’ve eliminated all issues that could be rider error THEN examine what could be causing the horse to react. Is it pain, fear, frustration, illness etc? LOOK at the situation and assess it from the horse’s point of view. Don’t think that spurs, harsher bits or “getting tough” are going to fix it.
5)      Don’t go beyond your abilities. Your ego is NOT the deciding factor here. There are two lives at stake and the other one deserves your consideration. Your lack of riding ability and ignorance can condemn your horse to the canners if he becomes unmanageable through your poor handling. Take the time to learn correct methods to get solid long term results.

Riding should be enjoyable, for both you and the horse. Proper riding makes it easier on both of you. Don’t stack the deck against yourself and try to learn too many things at once. Instead learn slowly, learn completely and learn safely. Wear a helmet, it’s your life at stake. Don’t follow dangerous trends and don’t let your ego rule over common sense.

Don’t compete in order to have a reason ride, instead ride well so you have a reason to compete.

Tracy Meisenbach
Copyright 2014
             All rights reserved foreign and domestic
            Do not share, republish or post with written permission